Nail Trimming 101: Safely Grooming Your Dog’S Nails
Trimming your dog’s nails regularly is an important part of their grooming routine. While some dogs can naturally wear down their nails from walking and playing on abrasive surfaces, most dogs require manual nail trimming to keep their nails at a healthy length. Overgrown nails can lead to pain, mobility issues, and other health problems. Keeping your dog’s nails trimmed to an appropriate length will help prevent cracked or broken nails, promote comfort on walks, and maintain good paw health. This guide will provide tips on how and when to safely trim your dog’s nails at home.
When to Trim
It’s generally recommended to trim your dog’s nails every 2-3 weeks. More active dogs that spend time outdoors may naturally wear down their nails enough to go a bit longer between trimmings, while less active indoor dogs or dogs with long quicks (the blood vessel inside the nail) may need more frequent trims closer to every 10-14 days (1).
Signs that it’s time for a trim include nails that are clicking loudly on the floor when the dog walks, nails that are overgrown and curling under the paw, or nail tips that you can hear scrapping along surfaces. If your dog shows any signs of discomfort when walking or their paws are splaying, it means the nails are too long and interfering with normal motion. It’s best to trim just the very tips each time before the nails get excessively long (2).
Puppies often need more frequent nail trims while they are growing, such as every 1-2 weeks. Senior dogs may also need their nails checked more regularly as the nails tend to thicken and grow faster with age.
Preparing for a Nail Trim
Proper preparation is key to ensuring a stress-free nail trimming experience for both you and your dog. Start by gathering the necessary supplies, including a nail clipper suited for your dog’s size, styptic powder to stop bleeding if you cut the quick, and treats to reward your dog during the process. Choose a location such as a table or countertop where you can comfortably restrain your dog. Have a helper on hand to assist in calming your dog if needed.
Before trimming, it helps to get your dog relaxed and accustomed to having their paws handled. Massage their paws gently and touch each toe to desensitize them. Give treats and praise while doing this. Take a few sessions over the course of a few days to get them comfortable with the process. Remain calm and assertive as dogs can pick up on anxiety. The more positive associations your dog has with nail trims, the easier it will be each time.
Once your dog seems relaxed with their paws being handled, they are likely ready for a nail trim. Have your clipper and supplies at the ready. Move slowly and with care, and be prepared to take breaks to keep your dog comfortable. With time and positive reinforcement, regular nail trims will become much easier. For particularly anxious or excitable dogs, speak to your veterinarian about options to make trims less stressful.
Identifying the Quick
The “quick” is the soft tissue inside the nail that contains blood vessels and nerves. It’s important to identify the quick before trimming your dog’s nails to avoid cutting into it, which is quite painful for dogs.
On white nails, the quick is easier to identify as a pinkish area inside the nail. You’ll want to avoid cutting into this area. The quick on dark nails can be more difficult to locate since it blends in with the nail color. But you can still identify it by looking closely for a grayish oval shape within the nail.
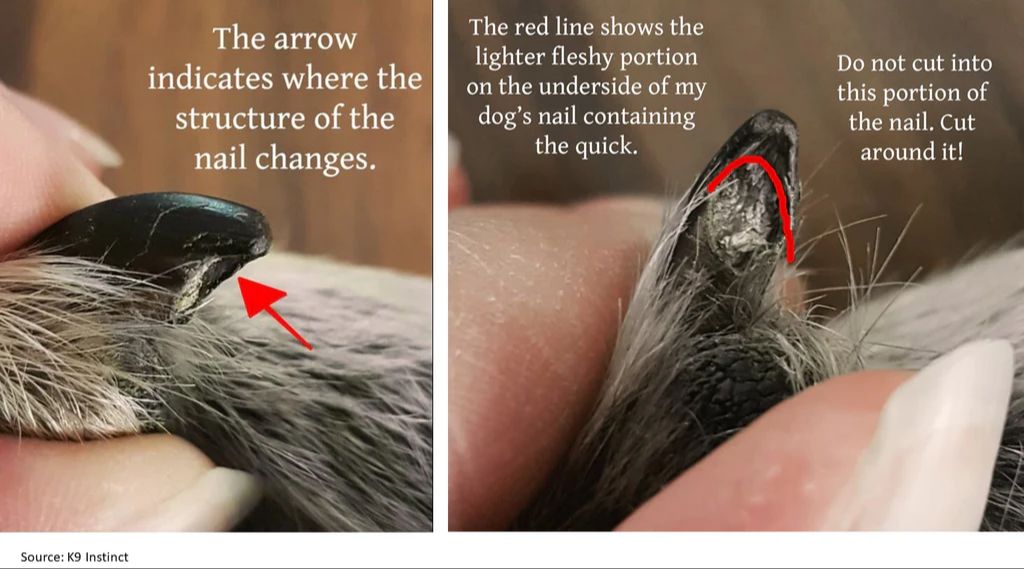
You can also identify the quick by looking at the nail from the side. The quick will appear wider at the bottom and come to a point toward the tip of the nail. Aim to trim just before this point. Additionally, if you shine a flashlight through your dog’s nail, the quick will look more opaque while the dead nail will look more translucent.
If you accidentally hit the quick, it will bleed. In this case, apply styptic powder or cornstarch to stop the bleeding. Be more conservative with trimming next time. It’s better to trim a little at a time than risk hitting the quick.
With practice and patience, you’ll get better at identifying the quick to avoid it while trimming your dog’s nails. Go slow, check frequently, and have styptic powder on hand just in case.
Trimming Technique
Trimming your dog’s nails step-by-step properly is important for your dog’s comfort and safety. Here is a process for trimming your dog’s nails:
- Gather the proper supplies – nail clippers or grinder, styptic powder/gel, and treats.
- Sit on the floor with your dog in front of you and gently hold the paw to trim.
- Identify where the quick ends inside the nail and avoid cutting into it.
- Position the clippers at a 45 degree angle and trim only a small portion of the nail tip.
- Use calm, relaxed motions and pause if your dog gets anxious.
- Give a treat and praise throughout for reassurance.
- Stop and apply styptic if you trim too close and cause bleeding.
- Pay extra attention and go slowly for dark nails where the quick is harder to see.
- Grind the nails smooth when finished clipping to avoid sharp edges.
Taking it slowly, making your dog comfortable, and doing small trims often helps make the process easier for both you and your dog. For more details see this reference: https://www.akc.org/expert-advice/health/how-to-trim-dogs-nails-safely/
Grinding Nails
Using an electric nail grinder is another option for trimming your dog’s nails. A nail grinder uses a rapidly rotating grinding stone to smoothly file down the nail. Many owners prefer grinders because they reduce the risk of cutting into the quick. The grinding action softly wears the nail down rather than cutting it, making it harder to hit the quick accidentally.
To use a grinder, turn it on first and let your dog get used to the noise. Hold the spinning stone against the nail at a 45 degree angle and gently file the nail down a little bit at a time. Make sure the grinder isn’t getting too hot and avoid holding it in one spot for too long. Work carefully to remove only small amounts until you reach the desired length.
The soft grinding can be less stressful than clippers for anxious dogs. However, grinders do take longer than clipping. It’s also important to monitor the heat and avoid irritating the nail bed with excessive friction. Be very cautious using grinders on dogs with dark nails where the quick is difficult to see. Despite the safety benefits, it’s still possible to grind into the quick if you aren’t careful.
When used properly, an electric nail grinder is a safe and stress-free alternative to clippers for trimming dog nails. Just be patient, go slowly, and carefully monitor the nail as you grind to avoid hitting the quick. Regular grinding can help maintain healthy nail length.
Trimming White or Dark Nails
There are some key differences when trimming white versus black dog nails. With white or light-colored nails, the quick is visible as a pinkish area inside the nail. This makes it relatively easy to avoid cutting into the quick. According to Pupford.com, “White nails are easier because you can see the pink inside (the quick).”
With black or dark nails, the quick is not visible, which makes trimming more challenging. As DrChuckBooks.com explains, “Black is harder since you can’t locate exactly where the quick is.” When trimming dark nails, you will need to trim off only small sections of the nail at a time until you start to see a grayish-black dot appear in the center. This indicates you are reaching the quick, and you should stop trimming to avoid hitting it. Going slowly and cautiously is key for dark nails.
There are some tricks to identify where the quick likely starts, such as looking at the nail head-on to see where it starts to curve inward. But extra care and patience is required for dark nails. It can also help to trim only the sharp tip of black nails frequently, rather than taking off large sections.
Managing Squirming/Anxious Dogs
Some dogs become very stressed during nail trims. If your dog squirms, shakes, or tries to bite when you trim its nails, try the following tips:
- Go slowly and work in short sessions. Only trim 1-2 nails per session until your dog is more comfortable.
- Ask someone to help hold and reassure your dog during the trim. This provides both physical and emotional support.
- Give your dog a special chew treat or toy during the trim to provide positive distraction.
- Apply gentler trims instead of normal trimming. File nails using a nail grinder or simply trim the very tips each session.
- Begin handling your dog’s paws when relaxed to get them used to touch. Provide praise and treats.
- Try calming aids like treats with hemp or CBD. These alleviate stress during the process.
- For extremely anxious dogs, ask your vet about anti-anxiety medication that can be taken prior to a trim.
- Seek the help of a professional groomer or vet. They have experience handling difficult dogs for nail trims.
With time and positive reinforcement, anxious pups can learn to better tolerate nail trims. But be patient and never punish fearful behavior during the process. If your dog strongly resists nail trims, work slowly to accustom them or seek professional assistance.
Aftercare
After trimming your dog’s nails, it’s important to watch for signs of bleeding or irritation and properly care for their paws. If you accidentally cut the quick and the nail bleeds, don’t panic. Apply gentle pressure with a clean cloth or gauze until the bleeding stops, usually within 5-10 minutes. Styptic powder or gel can also help coagulate the blood more quickly. Keep the paw elevated above your dog’s heart level to reduce bleeding. It’s best to have styptic powder or gel on hand before trimming nails, just in case. Don’t use human bandages, which can irritate the skin or be chewed off.
Watch for excessive licking, chewing, or limping after a nail trim, which may indicate pain or discomfort. Try to keep your dog from licking the paws excessively. If needed, use an Elizabethan collar to prevent licking and chewing. Apply antibiotic ointment to the nails if irritation occurs. It’s also a good idea to give your dog praise and a treat after nail trims to create a positive association.
If bleeding persists beyond 10-15 minutes, the nail feels loose or detached, or you notice signs of infection, contact your veterinarian right away. With proper technique and care, nail trims don’t have to be traumatic for you or your dog.
When to Seek a Vet
It’s a good idea to have a vet examine your dog’s nails if you notice any signs of potential issues. Some signs to watch for include:
- Excessive bleeding when trimming nails
- Nails that are red, inflamed, or swollen
- Discharge or pus around the nails
- Misshapen, curved, or cracked nails
- Nails that are very brittle and keep breaking
- Lameness or limping that seems to be caused by nail pain
- Nails that are overgrown and begin curling under the paw
- Black or darkened nails that indicate a nail infection or nail bed injury
- A nail that falls off completely
These signs can indicate issues like infections, injuries, or nail disorders that require veterinary attention and treatment. It’s important not to ignore abnormalities with your dog’s nails. Left untreated, some nail conditions can lead to intensified pain, permanent nail damage, or spreading infections. Don’t hesitate to have your vet assess your dog’s nails if anything seems amiss.